Friday, December 31, 2010

Welcome 2011!

Happy New Year's to all of you, my lovely readers!  Here's a roundup of green building materials from one of my favorite sources of green inspiration.. re-nest.  Happy reading!

image from re-nest

Wednesday, December 29, 2010

drywall

I always find the drywall going up to be such an exciting stage.  The inner workings of the house are all hidden away, and it becomes so much easier to envision living in the space.  We used standard drywall board, and Synko classic finish drywall compound.  I did come across some interesting products in the research stage though.  In looking for a greener drywall board I found Magnum Board, there's another interesting link here.  This product looks pretty amazing, but for this project the cost was above our budget.

Drywall does have some green qualities of its own.  We purchased our CGC boards through WinRoc (a Canadian company), and the paper backer and face are made of 100% recycled content.  Gypsum is a naturally occurring mineral, and the boards manufactured by CGC are no-VOC.  There are alternatives with high recycled-content (although our installers mentioned some difficulties with installation) or synthetic gypsum.  As always we were under a time crunch (why, oh why do I leave everything to the last minute???) and this often affects our decisions as well.  Wouldn't it be nice to build a house with no timeline?  Then you could really make sure every detail was just so.


We were unable to find a no-VOC drywall mud locally.  There is an excellent product by the name of Murco which we tried to get in from California through Winroc, but again the cost was prohibitive.  I am looking forward to the day that these kinds of non-toxic building materials are widely available and cost competitive.

Luckily, we had a plan B in Synko Classic Finish Drywall Compound.  The classic finish has a very low VOC of <2g/l.  Not zero, but really really good.


Can I just mention here how gorgeous the light is in the house?  I took these photos to show the drywall installation, but the light steals the show!  Just look at the way it streams in through the polycarbonate panels!  The above set of panels faces East, so this is the morning light.


This photo shows the band of light caused by the panels on the South wall.  It lights up the back half of the house, and I love the way the light is diffused, as it will be landing on my kitchen cupboards and counters.  If it were clear glass up there I would need to cover it to filter the light.  Fantastic!  With the drywall installed, we can see how much natural light is bouncing around inside.  The walls will be staying white to maximize that effect!


This shows the drywall return to the window.  I'm so glad we went with a drywall return instead of trim.  It is so clean and sleek.


The exterior drywall on the carport ceiling.  This will get a fresh coat of acrylic stucco in the spring.

Monday, December 27, 2010

exterior doors

We chose insulated steel for our exterior doors.. I won't name the supplier as we were unhappy with the service we received.  The doors, however, look fabulous!  We added a custom window and seamless edge for the front entry, and the other three doors are just plain slabs of steel.  

The choice for a sustainable exterior door was between steel and fiberglass.  They seem to both have advantages, and we settled on steel because Greg believes it will be more durable and I prefer the look to fibreglass.  The kids will like them because they'll be able to stick artwork on them with magnets!

the front door, ready to be installed.. it will get a spiffy coat of paint in spring.

Friday, December 24, 2010

Greg Sczebel

Here's a little christmas treat for you... we went to this amazing concert at the streaming cafe last Saturday.. this is my new favorite Christmas song.  It's not available for download yet (new album for next Christmas), but I am humming it all the time anyway!

Merry Christmas...

...and a happy new year to you
It's Christmas Eve, and we were so hoping we would be living in "the forest" house by now.. but it was not to be.  The projected move-in date is now January 15th.  In the end it doesn't really matter, and another Christmas in a rental house that does not feel like home is not a real problem.  It could be worse, and as always at this time of year my thoughts turn to how fortunate we are for what we have, and who we have around us.  So on that serious note, I am giving myself permission to relax amid the mess and the boxes so that I don't forget this Christmas completely.  Oh, and eat some chocolate while listening to my favorite Christmas tunes.  That always helps.

Thursday, December 23, 2010

Insulation

The insulation has made visiting the house so much more comfortable.. we had the walls spray-foamed, and now a little space heater keeps the whole house well above freezing.  After many discussions and visits by five(?) different insulation contractors, we settled on Icynene spray foam, and Advantage Insulation.  Icynene is made of castor oil, is sprayed without propellants, and doesn't settle over time.  There is some off-gassing initially as it cures, but all off-gassing stops after 24 hours.  We are so happy with our decision!

Here you can see the spray below and the batts above
The exterior walls were all sprayed, and the ceiling is insulated with  formaldehyde-free fibre glass
here you can see how the foam overfills, then is cut back
this shows the spray-on vapor barrier that is required by local code
the layers
Greg also spray-foamed around all the windows and doors.  You can see here how the Icynene fills the one-inch air gap we left behind the steel framing.   Spray foam (like most unusual building products) is yet another hotly debated topic online.

Monday, December 13, 2010

Misstep

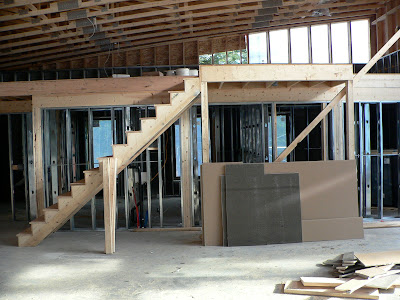
The stairs has been a much discussed topic ever since we decided to put the loft area in.  We thought we didn't have room for a conventional staircase, so initially we were considering something like this...
yum yum farm house kitchen loft
image from Dwell
which I love so much, but visions of little ones tumbling down forced us to come up with something more practical.  That led to considering this..

misterstep
or this...

boingboing
ok, maybe we didn't really consider the last one.. but it is so cool I just had to show you.  I am not sure how the BC building code applies to any of the above solutions anyway.

the stairs before
In the end what did we end up building?  A boring old set of stairs... with support posts no less. 
Had we been more decisive and organized, we could have at least cantilevered the landing so that the stairs looked like they were floating.  In fact, we planned so poorly that we didn't even have enough head room to walk up the stairs without ducking.  Oops.


the stairs before
 And so two risers were removed, and it is so much better. (Sorry Johnny and Lucas)

the stairs after
Now we just need to jazz them up.  Make them look less conventional, and maximize their potential.

the stairs after
We have some ideas... we'll know more this week.  Don't worry, I'll show you the progress as we go.  What would you do, if these stairs were yours??

Saturday, December 11, 2010

studly steel

Just a quick note to show you the steel stud framing... we did the exterior walls in 2x6 steel, and all other walls with 2x4.  Okanagan Drywall did the steel framing, and will be doing the drywall when the time comes.  It was a surprise to me that drywallers do steel stud framing.  Who would have guessed?

We left a 1" air gap between the framing and the exterior wall to prevent cold and heat transfer through the walls.  We also had the carport and front entry poured.  There is a donnacona thermal barrier between the main concrete pad and the front entry, so it had to be done in two pours.

The front entry

The front entry.. you can see here that we indented it by about 4 feet to provide cover for the entryway. 
You may notice we moved the front entry door from it's original placement on the right hand wall.  Somehow the wall ended up too short and the door wouldn't fit.  Thank goodness it and the window (just) fit on the one wall.  Incidentally it will give us more office space inside, so it is all for the best.

The front entry from the inside, and looking out the door to the carport 
The mudroom 
View from the mudroom... what a treat to have a beautiful forest view out each and every window! 
The carport floor 
The bathroom 
This shows Greg's handy framing in the bathroom... including the ledge (for shampoo) that I insisted on.  A framer Greg is not - so I appreciate all the time he spent doing this in the freezing cold (thanks honey!).

The front entry with the windows and exterior drywall in place.. and oh look!  the snow!
This is the exterior with the windows and exterior drywall board installed.  Soon the insulation will go in, and we will all be glad for that.  We had been hoping to beat the snow and get the driveway completed, but it didn't quite happen.  Likely it will have to wait for spring now!

Friday, November 26, 2010

polycarbonate panels - the install

Installing the polycarbonate panels was an exercise in patience for both of us.  Perhaps we had a little less (patience) due to the cold wind and tight timeline.  Regardless, it got done, and if I do say so myself we did it well!

Mega-Lock Aluminum Glazing System
A profile of how the Mega-Lock system works
Greg started by cutting all the base profiles, then I added the gaskets.  Greg then screwed the base profiles onto each upright 2x4.


Greg measuring... and measuring. 


Installing the first base profile
I attached two strips of EPDM gasket to each base profile and cover profile.   The whole time my mouth watered for black licorice.
When that was done, Greg took accurate measurements of each opening.  The heights were all the same on this wall, but the widths varied slightly.  Next he got to work cutting the panels with a table saw.  Once cut, we blew out the little shavings with compressed air.  Cutting the panels makes quite a mess with little static-y bits everywhere so we found it best to keep the cutting and prep areas separate.  Greg also had to cut all the U profiles to the same width as the panels.

the bare panel, ready to be prepped
Then everything was ready to be prepared for install!  I peeled the protective films back about 6", wiped off any debris and added the aluminum vent tape to the top and bottom edge.

adding the aluminum vent tape
I tapped the UA Edge profile on with a rubber mallet (those tougher than me could do this by hand).  I also made sure the fit was good, and that the black side would be facing out along with the UV protected side of the panel.

the finished panel

Greg then took the panels up the scaffolding and installed them.  Initially he had some difficulty getting the screws to puncture the aluminum while up against the wall, so he screwed them in partway before attaching the cap profile to the wall.  Then he held all the pieces in place and screwed the cap in place. This compresses the panels between the gaskets which makes them watertight.  We decided to leave all the cover profile pieces off until we are sure we will not need to make adjustments.


the first two panels in place, with the cap profile installed


the view from inside... see the lovely translucency of the panels?
ignore the gap at the top, Greg fixed that..


The finished panels from the inside - just look at that gorgeous light!

The finished panels from the outside.  Yes, we're missing the Left edge piece, Greg couldn't quite reach from the scaffolding.  On the list for another day.  As you can see it is cleverly tuck taped down..
You may remember that we had planned on having the panels stretch the length of the wall, but when the trusses went up we discovered that a shear wall was required on either side of the panels to stabilize the roof.  This has left us with quite an asymmetrical wall.  I think we'll be able to balance it out with some of the exterior details, and that it will ultimately lead to a more interesting facade.  Better to have a sturdy house than a pretty one (that's what i'm told...)!


The panels from the outside.  The cover profile had not yet been added, so you can see where we screwed through the top to compress the whole system together. 
We ran short of a few pieces due to the reconfiguring of our panel layout.  We decided to use the panels that would have been on the south wall (but got eliminated with the addition of the shear walls) to the east and west walls.  The sides are slightly angled, and splitting the panelled areas up resulted in needing more "end" pieces.  So, the remaining pieces are en route and will be installed upon arrival.  Had I thought ahead and ordered 10% extra to allow for waste and mistakes we may have had enough.  I don't know why I forgot to do that, but I did... one more lesson learned.

And so, the next time we install polycarbonate panels, it will be a piece of cake!  We actually do have a stack in storage which we plan to use inside.. but you will have to wait and see!


Sunday, November 21, 2010

winter wonderland

the forest has transformed into a magical land of ice and snow
perfect for snow angels.. 
and making tracks..
the best perks of building in the country..
marshmallows and a fire.

Friday, November 19, 2010

Polycarbonate - prep

Our polycarbonate panels arrived all bundled up as scheduled from Greenwall Solutions, and when we were ready for them we carefully unpacked them to get ready for our install....
You can see here the hollow cores of the panels, and that they have protective film on both sides.  The branded side faces out because it has the UV coating. 
Greg counting, re counting and counting again.  These are the U channels that secure the top and bottom of the panels. 
We chose to have the panels and aluminum pieces pre-cut slightly larger that we needed.  This was to save on shipping costs and to make handling easier.  We figured that because we were going to be installing them on the face of the trusses, there may be some discrepancy in measurements.  A good call all around.

The goodies in the box.. more on this next post
The aluminum pieces come stock in white, and we decided we would paint them black ourselves to prevent any delay.. they can be custom colored in the factory, but it adds 2-3 weeks to the delivery time and we wanted them sooner.  As it turned out the pieces sat getting rained on for at least that long so we could have had them done.  Ahh well, it's been a while since I have stretched my DIY muscles, and it gave Greg and I some quality time without the little ones... something we have not done much lately.

ready to go
A little Tremclad will do the trick 
the uprights waiting their turn
A couple of quick coats of Tremclad got everything done, and they look lovely in black!  We're thrilled with how it turned out, but I will advise that the factory finish is FAR more durable than our spray job.  The Tremclad scratches very easily, and as we still had some cutting to do some damage was done here and there.  


One more post is still to come, and I'll tell you all about the installation.  Stay tuned!